


Have you seen this before? Latte Art is state of the art when it comes to drink preparation and presentation. It is visually stunning, and to me, it indicates that the preparation of both the espresso and the foaming and texturing of the milk are textbook perfect.
Two key factors are absolutely required to produce latte art: a quality espresso shot, and the perfect milk froth. Espresso is very unforgiving. Most places do it poorly and have no hope of building up the deep, rich crema texture and color required to build the artwork. Milk is equally unforgiving. When it is expertly handled, milk morphs into a liquid that has a quicksilver sheen with an unbeatable texture on the palate. Most places don’t do this kind of milk – instead you get scalded liquid with big bubbles on top, or dry, dead stuff that you can build mountains from.
There is one unspoken truth about quality latte art: it indicates the barista has an underlying passion for exceptional coffee. You cannot learn to pour latte art in an afternoon. You can be shown how, but the practice and perfection of it takes some doing. Blindly feeling my way through things, it took me months of late nights, burning through litres of 2% milk and pounds of espresso. I’ve in turn shown many of my staff how to do it and it has taken them a long time to really nail it down, and even then the consistency isn’t always there. If there is a shortcut to latte art expertise I haven’t found it. Fortunately, like riding a bike, once you’ve got latte art down pat, you’ve got it for good.
It is a special thing to pour a beautiful rosetta latte, and to watch a customers eyes light up as they marvel over your creation. Often their frequency of visits to your shop increases, now accompanied by a friend and crying out, “Do it again, do it again…”
The first time I saw latte art live and in full color was at Espresso Vivace, a cafe located in Seattle, Washington, when my boss and I were in the city on a coffee field trip. I was a wet behind the ears, “on fire for espresso” zealot, previously a Starbucks apron. When we got our lattes, damn if we weren’t impressed. I was speechless, grinning like a fool, and in an instant I made a vow that I would learn vow to pour latte art. I would pour latte art if it was the last thing I did. It became personal. I couldn’t respect myself as a barista without this slight of hand with coffee and milk that I had just witnessed.
My first serious affair with an espresso machine began back in 1997 with a Conti Catronic MK-10. A flaxen haired beauty that pulled espresso like fruit nectar and created tight milk foam that could take your breath away. Together we spent hours making sweet, um… espresso based drinks, and learning each others quirks. We fell in love studying the intimate details of pouring latte art.
After months of vain attempts one day it just happened, I crossed over. The timing, and the movement of the wrist married with perfect foam, and fabulous crema yielded my Holy Grail, the Rosetta Latte. It was all I could do not to slide across the floor pumping my arm up and down, a la Gretzky.
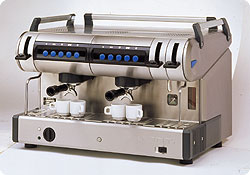
Soon after becoming “Master of the Latte Art” (or so I thought), I took my dog and pony show on the road, and I started training our wholesale accounts in the arcane ways of the barista (I work for a coffee roaster in Vancouver). Eager to impress, I wanted to create latte art for these people. I couldn’t. Well I could on some machines, but on most my proven technique honed on the Conti didn’t do jack for me. I was flustered, I was confused. Sure I could put together your “hot milk on espresso” style drinks, but there was no exquisite foam, and certainly no latte art. Initially I assumed that this had to do with the boiler pressure. “It must be set too high on these machines,” I reasoned. “Call the tech in to adjust that for you” I would say.
The epiphany came awhile later when the steam wand on the Conti had to be replaced. The Conti was a sure thing for me. I could create latte art foam with one arm behind my back. But once the new steam wand was in place, the ease with which I could create foam vanished, and I was left staring at milk pitchers of 160F big bubble foam! Old wand on the left: perfect foam. New wand on the right, big bubble foam. “Aggggh, what is going on?” Everything is the same except… except the steam tips. Hmmmm…
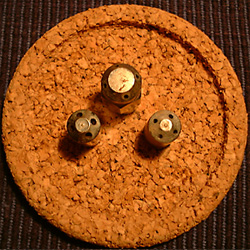
Have a look. The tip on the right creates perfect foam. The tip on the left doesn’t. The tip in the middle is the newest one, and it also creates dynamite foam. Note the size of the holes. Up until this point I had only heard of people speak to the number of holes (four or more), and the dispersion pattern of the steam tips (not too narrow, not too wide), but there is more to this puzzle. The size of the holes on the steam tips is a HUGE factor in your ability to create milk foam capable of latte art. I replaced the “new” tip with the old one from the worn out wand, and presto, I was creating beautiful foam all over again. Could it be that simple? Yes it can!
Next week, I’ll continue the latte art investigation, where I’ll discuss Cimbali machines and the steam tips, Nuova Simonelli designs, and our newest machine, the La Marzocco way of making beautiful foam.